
Trailing arm inspection advice from BPW
Trailer technology provider BPW has released inspection guidance for its Airlight II (AL-II) and Airlight Heavy Duty (AL-HD) trailing arms.
“As part of routine maintenance, it is important to inspect BPW Airlight II (AL-II) and Airlight Heavy Duty (AL-HD) trailing arms for fractures or signs of wear,” said the company.
“When inspecting the Airlight Series trailing arms for fractures, check the entire arm, including the spring eye. Particular attention should be paid to the area around the spring eye within the hanger bracket.
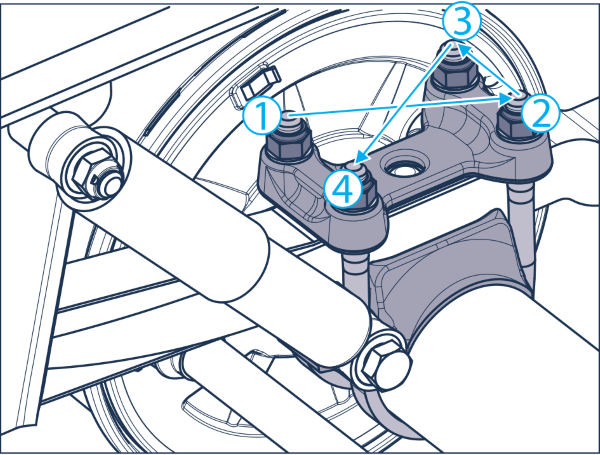
Fig. 1
“This should be visually and physically checked using a lever bar between the hanger and the arm to check for excessive play. Alternatively, you can carry out a drag test. A drag test requires a tractor or shunting vehicle to gently rock the trailer forwards and backwards while the trailer brakes are applied. A second technician must listen for any audible noises that indicate a broken trailing arm. This should be done from the side of the trailer and not underneath. Both the lever bar and drag test can also be used to check the wear on the trailing arm bush.
“Loose clamping or overloading can cause fractures around the clamping, so check this area for signs of movement or cracking.”
AL-II trailing arm
Said BPW: “M22 U-bolts (SW32) must be fitted. U-bolts must always be replaced in pairs. Do not reuse previously fitted bolts; they are a stretch fit and cannot be reused. Always fit new nuts and washers.”
Assembly instructions are given as follows: “First, grease the U-bolt thread and the contact surfaces of the lock nuts. Then tighten the self-locking nuts equally and diagonally in this sequence – 1, 2, 3 and 4 – until all have achieved a tightening torque of 200 Nm, then 300 Nm, then 450 Nm, and then all to 550 Nm. Finally, tighten all of the nuts in sequence by a further 90° angle.
“Fig. 1 shows the correct way to assemble the U-bolts on an AL-II.”
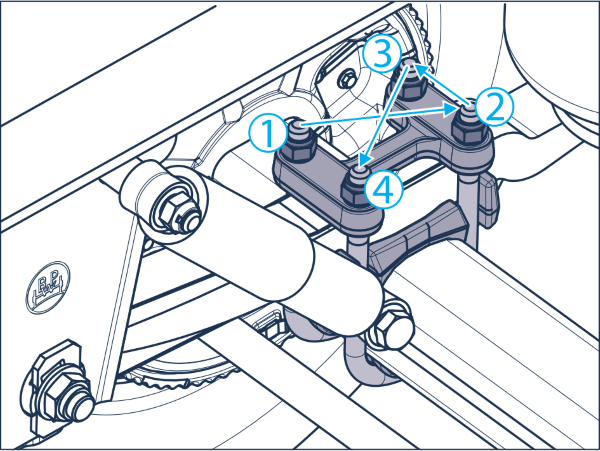
Fig. 2
AL-HD trailing arm
“M24 U-bolts (SW36) must be fitted,” said BPW.
Assembly instructions are given as follows: “Grease the U-bolt thread and the contact surfaces of the lock nuts. Then, tighten the self-locking nuts equally and diagonally in this sequence – 1, 2, 3 and 4 – until all have achieved a tightening torque of 200 Nm, then 300 Nm, then 450 Nm, and finally 650 Nm.
“Fig. 2 shows how to correctly assemble the U-bolts on an AL-HD.”
Those with any questions or who are unsure about any part of the trailing arm inspection process or U-bolt assembly can contact BPW Limited and an engineer will guide them through the process.