Tuning in for trailer repair tips
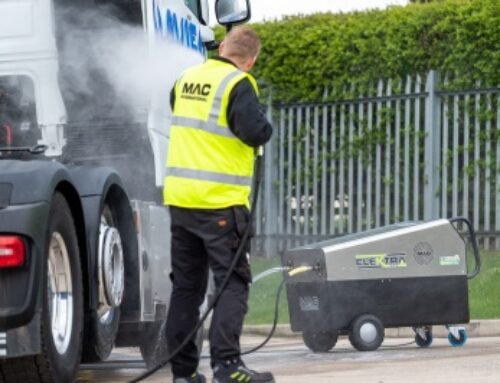
 Diesel Technic’s Mark Todd looks at the repair and maintenance of a trailer braking system, with some help from the company’s Parts Specialists
When you’re looking for answers, video has now become the go-to for workshop professionals.
Diesel Technic’s Parts Specialists are known among workshop professionals for their helpful videos on the correct installation of spare parts. Their YouTube channel now boasts over 11,000 subscribers, offering workshops and fleets hints and tips across a wide range of subjects covering commercial vehicles, coach and bus, and trailers.
Take the Parts Specialists video looking at the braking system on a trailer:
Walking you through their processes, Kevin and Lars cast an expert glance at the brake values and immediately spot the need to take a closer look at the braking system.
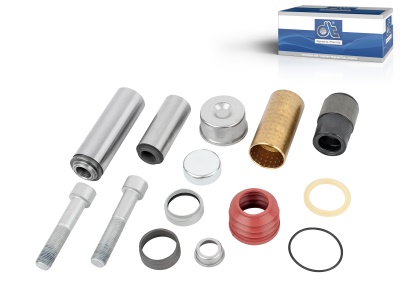
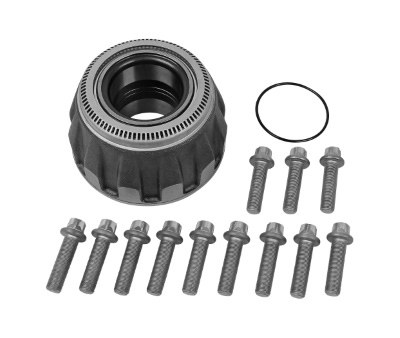
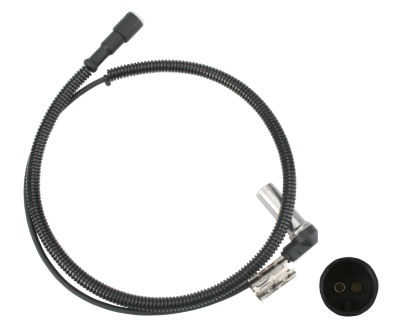
After removing the wheel from the second axle and securing the axle they note that the brake disc, the repair kit for the brake calliper and the wheel bearing all need to be replaced. An issue with the ABS sensor needs resolving, too.
 The beauty of video is that you can get a hands-on view of how these highly skilled professionals work and see how they do it. They also talk you through some of the most common error patterns to look out for, and offer invaluable hints and tips along the way.
For example, as they want to remove the spring brake cylinder right away, they have to disconnect the pressure lines – and note that in this case when there is no longer any pressure on the spring mechanism, the brake is automatically actuated.
They demonstrate how they use the emergency release pin to tighten the spring at the back, which prevents the brake from intervening – and offer up an additional tip: “If your vehicle has broken down, you can also use this quickly to help yourself get the vehicle out of the danger area. But this is very important: don’t drive like this for too long, just leave the danger area.”
Grease leaking out confirms that they need to replace the wheel hub. They point out how the contact pattern of the brake disc is worn (“you can already see on the edge here”) but caution that if you are not sure about it, to measure it and compare it with the manufacturer’s specifications to see whether it needs to be replaced.
Turning to the brake calliper they show how the sleeve has been stripped, which causes dirt and corrosion on the guide, which in turn makes it difficult to move. A second sleeve also needs checking for damage, and although it seems OK, they recommend replacing both guides. Although there is an option to replace the entire brake bracket or the brake calliper, they opt for the cheaper route with the repair kit.
 While Kevin gets the wheel hub ready for assembly, Lars is busy removing the old bushing which had rusted and become fused – noting that this is how breakdowns happen, so it’s a good thing they are being replaced too.
He also demonstrates how to clean the mounting surfaces, pointing out how important is that these are properly cleaned before the new bushings are mounted or you could run into assembly problems and malfunctions such as from too much tension, which would mean that while it is on the table you can still move it back and forth, but under pressure it can tilt, “which of course should not be the case”.
Installing the new ABS sensor, they add a new bushing and grease, and offer up some tips:
* Clean properly so that the new bushing still fits afterwards. The same goes for grease, to lubricate the ABS sensor so that it can move.
* There are sometimes problems with abrasion points on the cable of the ABS sensor if it is not laid correctly and this results in a defect. Or if the connector – there is a connection in it – was not put together correctly or connected the wrong way round, this can also cause errors. If you are not sure about this, check the resistance values on the various ABS sensors on the vehicle. In this way, you can find out for sure whether it is defective or not.
Once everything is put back together, and the spring brake cylinder is back in its proper position, Lars and Kevin offer up some final tips:
* Sealing plugs for ventilation: the lower one must be removed so that the condensation can drain off, but do not remove the upper ones, because water can enter leading to rust forming.
*Remember to attach the emergency release pin to the part as it may be needed in the event of a breakdown to push back the spring mechanism.
* Any leaks on the axle modulator are often due to the spring mechanism, i.e. there is an internal leak, which results in the air exiting through the air line at the axle modulator. Always check the spring brake cylinder first before you buy a new axle modulator.
* Remember when tightening the axle nuts on the right side, there is a right-hand thread, and on the left side is a left-hand thread, to avoid breaking the axle.
* If you change the brake pads or brake discs, always do this on both axles so that the wear is the same on both sides.
* Do not ‘thumb suck’ the torques! Always keep to the manufacturer’s specification.
And last but not least, undertake a functional test on the brake test stand, to check everything really works.
The complete trailer range from DT Spare Parts not only offers parts for the braking system, but also over 1,800 other items. These include universal parts such as side marker lights, warning markings, bump stops and much more.
Overall Diesel Technic offers more than 41,000 different items for trucks, trailers, vans and buses.